Oreo Dirt Cake: Easy No-Bake Chocolate Dessert
Oreo Dirt Cake is more than just a dessert; it’s a nostalgic trip back to childhood picnics and birthday parties, a whimsical treat that never fails to bring smiles. If you’re looking for a crowd-pleasing dessert that’s as fun to assemble as it is to devour, then this Oreo Dirt Cake recipe is your golden ticket. What makes it so universally loved? It’s the magical combination of crushed chocolate cookies that mimic rich, dark soil, layered with creamy, dreamy pudding and sweet whipped topping. This isn’t your average cake; it’s a delightful edible landscape, often adorned with gummy worms or candy rocks, transforming your dessert table into a playful garden. The simplicity of its creation belies its extraordinary deliciousness, making it a go-to for potlucks, holidays, or just when you need a little bit of edible magic in your life. Get ready to dig into this irresistible Oreo Dirt Cake!

Oreo Dirt Cake: A Delectable Delight for Every Occasion
There’s something inherently fun and delicious about Oreo Dirt Cake. It’s a no-bake dessert that’s as visually appealing as it is tasty, resembling a miniature garden plot just waiting to be dug into. The layers of rich chocolate cake, creamy pudding, and crushed Oreos create a symphony of textures and flavors that will have everyone asking for seconds. This recipe is perfect for birthdays, potlucks, or even just a fun weekend treat. It’s also incredibly easy to assemble, making it a fantastic option for novice bakers or when you need a crowd-pleasing dessert in a hurry.
Ingredients:
- 1 box chocolate cake mix (plus ingredients on back of box – typically eggs, oil, and water)
- 12.8 oz hot fudge sauce
- 3.4 oz instant chocolate pudding mix
- 1 3/4 cups milk
- 30 Oreo cookies (crushed)
- 3.4 oz instant chocolate pudding mix
- 1 3/4 cup milk
- 8 oz cool whip, thawed
Instructions:
-
Baking the Chocolate Cake Base
The foundation of our delicious dirt cake starts with a rich chocolate cake. Prepare the chocolate cake mix according to the package directions. This usually involves adding eggs, vegetable oil, and water. Whisk them together until just combined – be careful not to overmix, as this can lead to a tough cake. Once your batter is ready, pour it into a greased and floured 9×13 inch baking pan. Bake in a preheated oven at the temperature specified on the cake mix box (typically 350°F or 175°C) until a toothpick inserted into the center comes out clean. This usually takes around 30-35 minutes. Once baked, let the cake cool completely in the pan. It’s crucial that the cake is fully cooled before proceeding to the next steps; a warm cake will melt the other components and ruin the layered effect. Once cooled, use a fork to gently crumble the cake into bite-sized pieces directly in the pan. We want a crumbly texture that mimics soil, so don’t worry about perfection.
-
Creating the Rich Hot Fudge Layer
Now, let’s add a layer of pure indulgence. After your chocolate cake has cooled and been crumbled in the pan, gently pour the entire jar of hot fudge sauce over the crumbled cake. Use a spatula or the back of a spoon to spread the hot fudge evenly, ensuring that all the cake crumbles are coated. This layer adds an intense chocolate flavor and a wonderfully gooey texture. It’s important to use a good quality hot fudge sauce for the best results. You don’t need to heat the hot fudge sauce beforehand; it will distribute nicely over the cake at room temperature. Take your time with this step to make sure you get good coverage, as this will be a delightful surprise in every bite.
-
Preparing the First Chocolate Pudding Layer
Next, we’ll prepare the first of our two chocolate pudding layers. In a medium bowl, combine one package of the 3.4 oz instant chocolate pudding mix with 1 3/4 cups of milk. Whisk vigorously for about 2 minutes, or until the pudding starts to thicken. Instant pudding is a lifesaver for quick desserts, and it sets up beautifully. Don’t be tempted to add more milk; the ratio is precise for optimal consistency. Let this pudding mixture sit for about 5 minutes to fully set. Once it has thickened to a pudding consistency, gently spoon this layer over the hot fudge-coated cake crumbles. Again, try to distribute it as evenly as possible across the entire surface of the pan.
-
Assembling the Oreo “Dirt” and Second Pudding Layer
This is where our “dirt” comes into play! Take your 30 Oreo cookies and place them into a zip-top bag. Use a rolling pin or the bottom of a heavy glass to crush them into coarse crumbs. You want some texture here, not a fine powder, so aim for pieces that resemble soil. You can also pulse them briefly in a food processor if you prefer. Now, in a separate bowl, prepare the second batch of chocolate pudding using the remaining 3.4 oz instant chocolate pudding mix and 1 3/4 cups of milk, following the same whisking and setting process as described in step 3. Once this second pudding layer has set, gently sprinkle about half of your crushed Oreo “dirt” over the surface of this pudding layer. This creates the first layer of our signature dirt look.
-
Adding the Creamy Cool Whip Topping and Final “Dirt”
Finally, it’s time for the creamy topping. Take your 8 oz container of thawed Cool Whip and gently spread it over the layer of pudding and crushed Oreos. Don’t overwork the Cool Whip; you want a light and airy texture. Use an offset spatula or the back of a spoon to create a smooth, even layer. Once the Cool Whip is in place, sprinkle the remaining crushed Oreo “dirt” generously over the entire surface of the Cool Whip. This is your final “dirt” layer, and you can be as liberal as you like to achieve that authentic garden bed look. For an extra touch, you can even add a few whole Oreos or gummy worms to decorate the top, making it look like they are crawling out of the dirt!
Chill and Serve
After you’ve assembled all the layers, cover the pan tightly with plastic wrap. Refrigerate the Oreo Dirt Cake for at least 2 hours, or ideally overnight. This chilling time allows the flavors to meld together and the layers to set properly, making it easier to serve. When you’re ready to serve, simply scoop generous portions into bowls. The contrasting textures of the crumbly cake, gooey hot fudge, smooth pudding, and fluffy Cool Whip, all tied together by the chocolatey crunch of the Oreos, make this dessert an absolute winner. Enjoy the delightful mess!
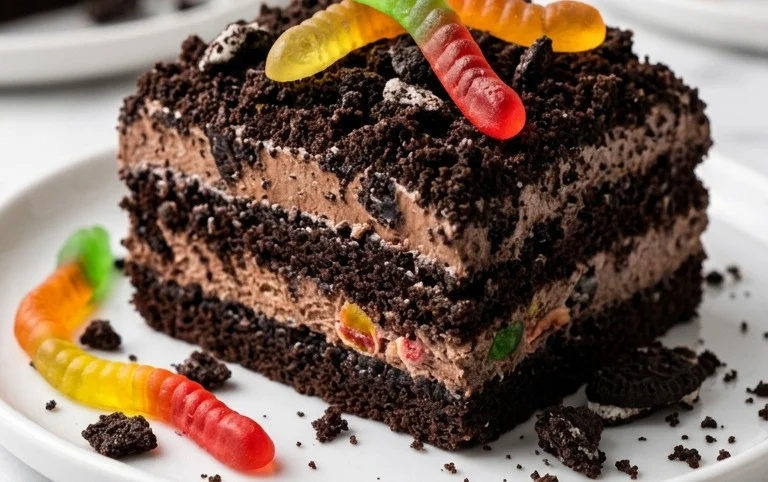
Conclusion:
And there you have it – your guide to creating the most delightful Oreo Dirt Cake! This recipe truly shines because it’s incredibly easy to assemble, making it perfect for any skill level in the kitchen. The combination of creamy pudding, crushed Oreos that mimic rich soil, and sweet whipped topping is a guaranteed crowd-pleaser. It’s a dessert that sparks joy and nostalgia, bringing smiles to faces of all ages. Whether you’re hosting a party, planning a potluck, or simply craving a fun treat, this Oreo Dirt Cake is an absolute winner. Remember, the beauty of this dessert lies in its simplicity and adaptability, so don’t be afraid to make it your own!
We love serving this dirt cake in individual clear cups for a fun, portable option, or in a large trifle dish for a show-stopping centerpiece. It’s fantastic at birthdays, BBQs, or even just a cozy movie night. For variations, consider adding gummy worms peeking out of the “dirt” for an extra touch of whimsy, or swirling in some chocolate ganache for a more decadent experience. You could also experiment with different pudding flavors, like chocolate fudge or even a cookies and cream variety. I wholeheartedly encourage you to give this Oreo Dirt Cake a try – I promise you won’t be disappointed!
Frequently Asked Questions:
Can I make this Oreo Dirt Cake ahead of time?
Absolutely! In fact, it’s best when made a few hours or even the night before. This allows the pudding to fully set and the flavors to meld together beautifully, ensuring a wonderfully cohesive texture.
What other candies can I add to my dirt cake?
The possibilities are endless! Gummy worms are classic, but you could also add chocolate rocks, candy-coated chocolates, or even mini marshmallows for added texture and visual appeal. Get creative!
How long does Oreo Dirt Cake last in the refrigerator?
Oreo Dirt Cake will stay fresh in the refrigerator for about 3-4 days when covered tightly. However, the crushed Oreos might start to soften over time, so it’s generally best enjoyed within the first couple of days for optimal crispness.
Oreo Dirt Cake
A classic no-bake dessert featuring layers of chocolate cake, hot fudge, creamy pudding, crushed Oreos, and whipped topping.
Ingredients
-
1 box chocolate cake mix (plus ingredients on back of box)
-
12.8 oz hot fudge sauce
-
3.4 oz instant chocolate pudding mix
-
1 3/4 cups milk
-
30 Oreo cookies (crushed)
-
8 oz cool whip, thawed
Instructions
-
Step 1
Prepare the chocolate cake according to the package directions. Let it cool completely. -
Step 2
While the cake cools, crush the Oreo cookies into fine crumbs. Set aside. -
Step 3
In a medium bowl, whisk together the instant chocolate pudding mix and 1 3/4 cups milk until thickened. Let it set for a few minutes. -
Step 4
Crumble the cooled chocolate cake into bite-sized pieces and place a layer in the bottom of your serving dish. -
Step 5
Spread a layer of hot fudge sauce over the cake crumbs. -
Step 6
Spoon half of the prepared chocolate pudding over the hot fudge layer. -
Step 7
Sprinkle half of the crushed Oreo cookies over the pudding layer. -
Step 8
Repeat the layers: cake crumbs, hot fudge sauce, remaining pudding, and remaining Oreo crumbs. -
Step 9
Top the final layer of Oreo crumbs with the thawed Cool Whip, spreading it evenly. -
Step 10
Chill the dirt cake for at least 30 minutes before serving to allow the flavors to meld.
Important Information
Nutrition Facts (Per Serving)
It is important to consider this information as approximate and not to use it as definitive health advice.
Allergy Information
Please check ingredients for potential allergens and consult a health professional if in doubt.


